UWM Hybrid Heroes
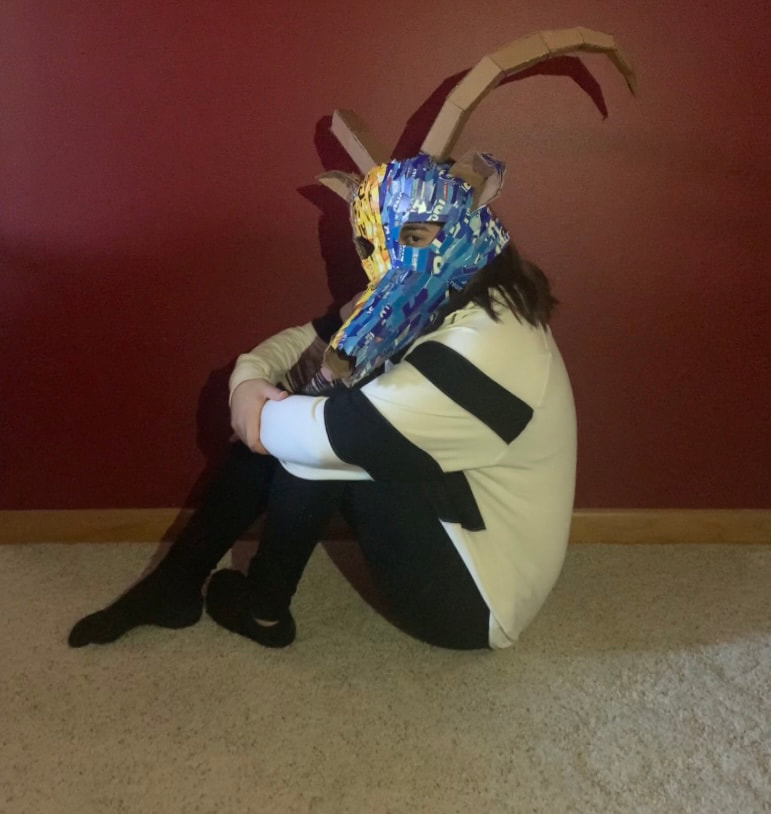
Title: Mask of Emotion
Medium: Cardboard and Glue
Date of Completion: February 2021
Exhibition Text
Mask of Emotion is a cardboard and hot glue piece and was created to show childish mischief as well as emotions that may be difficult for individuals to express. Mask of Emotion takes inspiration from Joan Miro's "The Harlequin's Carnival" and his use of vibrant colors and geometric and organic shapes. Inspiration also come from Bhutanese Masks, meaning behind the animal portrayed, and from Loki's Helmet, the mischievous factor as well as horns.
Process
Inspiration
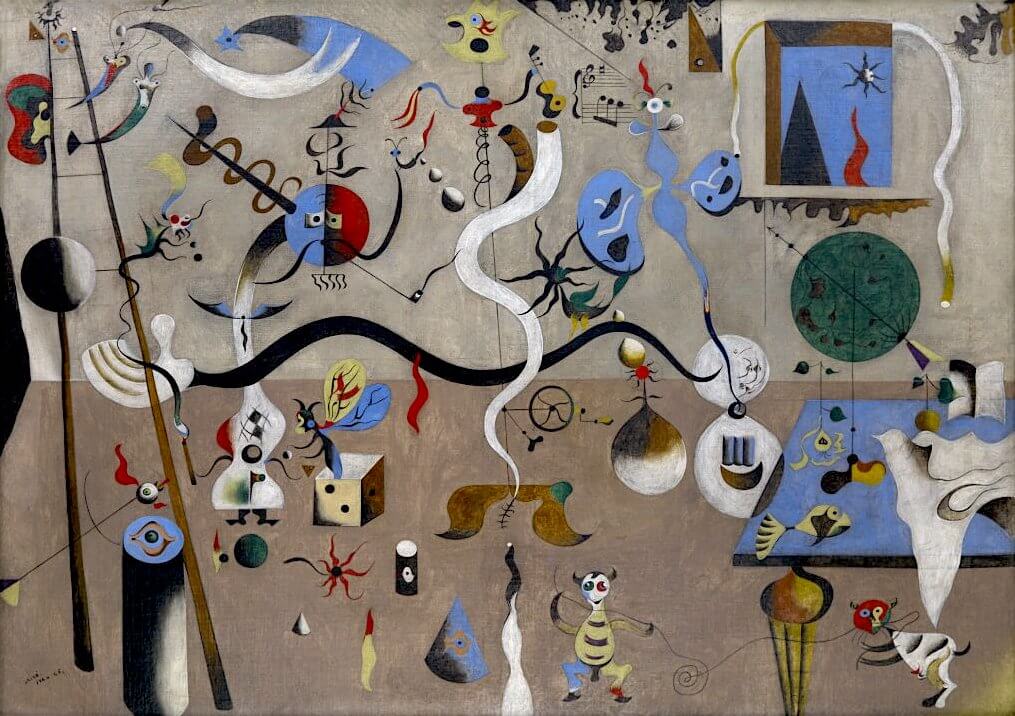
The Harlequin's Carnival, 1924-1925, Joan Miro
|
Carnival of Harlequin is a climactic piece from a series of paintings Joan Miró infused with the color scheme and landscape of his native land Catalonia, Spain. The figure depicted near the left-center is half blue and half red in reference to Italy's commedia Dell'arte. This harlequin figure was often times used as a depiction of the artist themselves within their paintings and Miro was influenced to use this after seeing Pablo Picasso's work. During the time in which Joan Miro created this piece, he was poor and could often not afford meals and was hungry. He described coming home one day and drawing figures while in a trance due to hunger.
I plan to use the use of geometric and organic shapes as an influence in my mask as well as using different variations of color in my final product as well.
|
|
Known for its mask dances which are an important part of the country's cultural and religious traditions in the small mountain kingdom of Bhutan. The dancers wear these masks which are made of wood or papier mache that are colorfully and richly decorated. Masks are often based off animals or deities.
I also plan to use these masks as an inspiration because I want my final product to be a mask such as these. I will base my mask off of a fox which is a symbol for mischief. They are also very richly colored and I would like my final piece to be somewhat vibrant
|

Bhutanese Masks
|

Marvel's Loki Helmet
|
Loki is the god of mischief within the Marvel Universe. His helmet is a symbol for Asgardian royalty and his mastery of mischief magic. It also emphasizes his villain aura rather than his heroic one. It is also linked to his past which has caused him to make "villainous" decisions. The design of the horns is so that they go outward and curve back inward. This could be a direct correlation of his personality because he can seem threatening and villainous on the outside but deeper, he has good intentions and has always wanted to be seen as good.
I will be taking inspiration from Loki's helmet as well from the marvel comics/universe. I want to take the design of the horns and incorporate it into my final product as well as the meaning of the horns.
|
Planning Sketches
|
This planning sketch is where I was writing important details and features of a Bhutanese mask and what I would be taking from the Bhutanese mask and incorporate into my final piece. Some important details about Bhutanese masks is that they are often made with vibrant colors as well as are sometimes based off of deities or animals. Another part of this sketch is a fox and what they are often characterized as. They are seen as cunning, clever, and mischievous so incorporating this animal into my final mask would add to my overall theme of mischief. I would take the idea of a mask based off an animal from the Bhutanese mask and the animal I would be using will be a fox.
|

|

|
This was another planning sketch with important features of my inspiration which is Loki's helmet. I really focused on the horn aspect of his mask because I really wanted to create horns on my final piece as well. His horns have many meanings behind them such as them emphasizing his villain persona and showing his mastery in mischief magic. They start off somewhat thick near the helmet but as they get longer, they are thin which can also show mischief. Originally I had decided I wanted to create a helmet like Loki's but I thought it would be too hard to make cardboard into a helmet shape. I ultimately decided upon making a mask such as a Bhutanese mask.
|
|
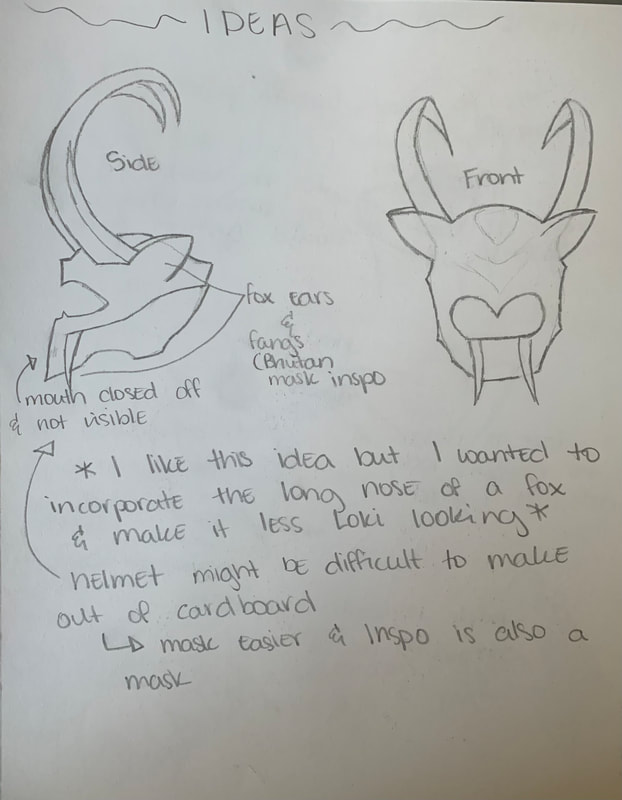
This was my first idea for a final design. I would create a helmet and incorporate the ears and fangs of a fox. I would also include horns such as Loki's into this design. I wanted the eye to visible because many people refer to eyes as the window to the soul. Eyes can show emotion and this mask is all about emotions. The mouth would not be made visible because people can always fake smiles to hide what they're truly feeling. I decided against this idea but I still liked it because of the dilemma of making cardboard into a helmet shape.
|
|

|
This was my final design for my finished product. I incorporated the nose of the fox as well as ears and also included Loki's horns. I liked this idea best and chose it for my final piece because it included all the necessary elements of each inspiration I wanted. I also decided to add overlapping layers of small rectangular cardboard piece to add color and texture to the piece. These pieces would act as the "fur" of my mask. I decided I would leave the inside of the ear and horns regular cardboard with nothing over it to show some vulnerability but also to show the geometric design of the horns.
|
Experimentation, Process, & Technique
Face Structure


|
I first began with a model of the measurements of my head using paper. This will be the structure that I will build off of and it will ensure that the finished structure will not be too small. The first circle is a measurement from below my chin to the top of my head. The second circle is perpendicular to the first and fits where it is barely touching my nose. I then taped them together because this would act as a model of my head. This will be called the two circle head model.
|
|
I then got a paper and folded the tips inward slightly while leaving the other side the full length. This gave a triangular shape which would then become the nose of my mask. I made two of these shapes. One was for the top where the nose circle was and the other was for the bottom where the chin was measured. I curved each piece along the original circular model to make it less flat and more realistic like a real fox's nose. This structure has a flexible shape and is somewhat flimsy at this time.
|


|


|
This next step is where I solved the flimsiness issue as well as made the snout or the nose of the fox more circular and realistic. I added curved pieces of paper around the edges of each of the pieces I made previously as to connect the two together and make it altogether more round. I am happy with the way this was turning out but I was somewhat skeptical about how I would produce this on cardboard because of the round areas.
|
|
Next, I cut the edges of the paper that was going over the two circle head model so that it would look much cleaner. This will also help for when I add more things on because it will fit more nicely and won't be overlapping unnecessary paper.
|


|
|
The next step of the face was the eyes. I decided to leave holes for the yes and leave it uncovered because that is what my inspiration, The Bhutanese Masks, were designed like. I also felt that eyes should be seen because "they are the window to the soul". My project is about expression/emotion so I thought this would be fitting. I created this mask type thing by having a flat piece of paper and cutting out my desired eye shapes. I then cut a straight horizontal line about 3/4s to the top of each side of the paper. After that, I attached the edge of the cut part and the corner which created a rounded, more 3D look. Then, I taped the edges to the model.
|


|
The eyes were the last part of the face structure model so after that I took apart each piece carefully so that I could use it as a pattern for the shapes I needed to cut out. I began with the nose. I equally folded and separated the nose into 8 pieces. I drew out one shape that I would use for the patter of all 8 (outlined in black to the right). This shape was wider and the top and narrower towards the end which would create a cone look.
|


|


|

|
I cut out each of the 8 pieces and carefully glued them all together to create the cone shaped nose. I was very pleased with how this came out because I wasn't too sure how the pattern would be after cutting it out and gluing it together using cardboard which is a hard to bend material. |
|
Next, I removed the eye area and folded it in a way that the shapes would be flat edged and still create the initial patter. I also made sure to make the bottom folds match up with the width one of the patterns for the nose. This would make it easy to glue to it without having excess cardboard hanging over. I then cut the pieces and shortened the top because I didn't want the eye area to take up too much room. I then placed the nose underneath the eye pattern and cut the lines so that both patterns would match up and leave no holes.
|
|


|
I then cut out the eye pattern and glued it onto the wider side of the nose. I realized here I had made a mistake because the eyes were meant to be touching but when I glued it onto the nose, there was an area which was open. I was disappointed but I decided to keep going and fill that area in with another piece of cardboard.
|
|
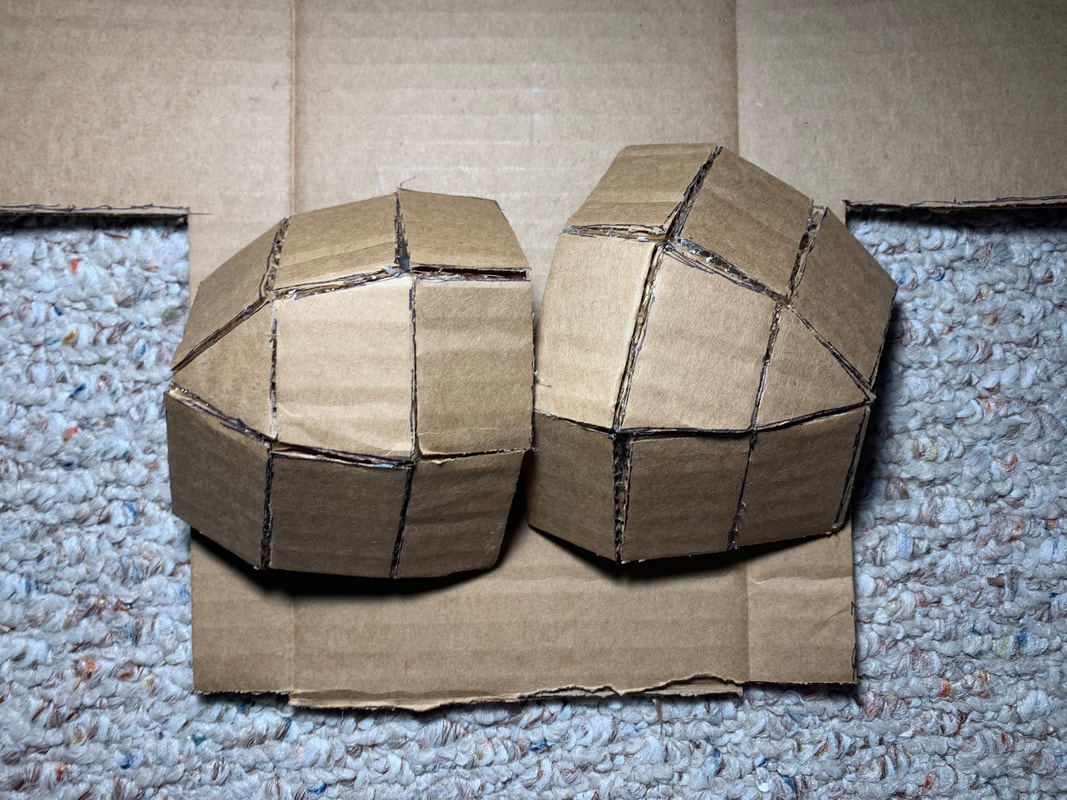
Then I decided to go higher and more curved at the top of the helmet. This would be the area in which the horns and ears would attach to. I created this pattern by creating small rectangles and attaching them together to create a rounded look. It was somewhat difficult because of the trapezoid and triangular shapes in the center which would make it look round.
|


|

|

|
This was the finished pattern of the top piece. I also used the eye pattern to make sure the pieces could be glued smoothly onto one another.
|
|
Then I cut out each piece and glued them together. They looked rounded and I was proud of the way they came out especially because it was my first time using cardboard to make something circular. I then glued the bottom of each of the curved pieces on to the top of the eye pieces. Each piece was the same width and was flat so they glued smoothly.
|

|

|
After that, the only part left was to fill in the gap between the eyes. I did this by getting a paper and tracing the area which wasn't filled. Then using that, I would cut out a piece of cardboard which would fit perfectly since I had traced the area beforehand.
|


Horn & Ear Structure
|
After creating the initial structure of the face for my mask, I decided to do the horns. I did this by rolling two papers. With one paper, it was a cylinder and each end's opening was the same width. On the second paper I made a cone shape. The circular side of the cone was the same width and the cylinder made previously. The other side of the cone was folded so that it would create a point. At this time, the structure was straight and had no curve at all. I then folded each piece and created equal parts of four vertically (4 sides). For the cylinder shape, I folded it into three equal parts horizontally. For the cone shape, i folded it into 4 pieces horizontally. This would make the horn structure look as if it go smaller at the top which is the look I wanted to achieve.
After this, I cut each piece I had previously folded horizontally. This structure was straight and had no curvature so to make the curve I cut each of pieces at the bottom at an angle. The angle was subtle near the root/thicker part but was more dramatic as it went to the top. I was very happy with how this paper model came out and was confident it would also come out good in cardboard. |


|

|
I began to cut out each side of the rectangle after I finished the paper model of the horn. The first part of the horn is a rectangular pyramid and all the faces are the same length with none being longer or shorter than the other. All the other rectangular prisms after this will have faces that are not all the same. The front piece of the next rectangle is longer at the front and shorter in the back which makes it tilt a little. This tilt is minor but with many of these pieces together, the curve will grow and become more noticeable.
|
|
I did the same process for each of the next rectangles. The longer faces of each rectangle were always in the front while the shorter pieces were always in the back. This made the curvature of the horns more apparent and obvious. For the last piece on the tip of the horn, it was a pyramid so that the end of each horn was pointy like Loki's horn. I really like how the horns turned out and I like each of the geometric shapes that you can see.
|


|


|

|
The next structure that I had to make were the ears. I wanted the ears to be curved and not flat or two dimensional. I experimented with folding paper and taping paper in many different types of ways but I liked this way the best. I created this ear by gluing two pieces of cardboard together but there was a large v shape missing from the middle of the top of each side of the ear. I glued the straight pieces first and then glued the top pieces together. This made the ear curve and made it look more realistic. I was happy with how this turned out because at first I wasn't sure how well it would turn out on cardboard but it turned out rather well for the thickness that the cardboard ws.
|


|
After I finished gluing the ear structures, it was time to start adding color to my mask and adding the vibrant "fur". Fur overlaps with the top being covered and the bottom being the layer over the rest. To create this look I glued my blue pieces from the tip of the ear down. I started off with gluing one piece and then slowly gluing other pieces below so that they would be barely overlapping and wouldn't show any raw cardboard. I tried to overlap many different hues of blue cardboard to add variety.
|


|


|
|
I continued this overlaying technique and continued to overlap each strand of blue cardboard until I reached the bottom. For the very bottom layer of the ear, I had to cut the bottom of each strand of fur to match the bottom line of the ear. This made the fur look more clean and realistic rather than untamed and wild.
|


|
I then did the exact same process for the other ear except this time with yellow strands of cardboard. I started from the tip of the ear and worked my way down while slightly overlapping each strand of yellow. I am really happy with how each ear would turn out because I wasn't sure how good it would look since it was cardboard and not ordinary paper but it turned out well and I am very proud of it.
|

|

|


|


|
I decided to glue the blue pieces onto the blue side of the mask next. I started from the very back of the mask and made a row which would be the very bottom row of the fur. I continued the method of slightly overlapping each strand so that no raw cardboard was visibly and did another row of strands. I continued to do this until I got near the eye. I didn't want any fur or cardboard strands to obstruct the area which the eye could see from so I had to take a slightly more careful approach.
|
|
Around the eye, I had to be more careful so that nothing would get in the way of someone's view.I lined the edge of the strand of cardboard to the top of the eye so that it gave it a clean look while still looking like fur. This was pretty easy to do for the top but took more work for below the eye. I had to cut the tip of each strand of blue so that it wouldn't cover any open area of the eye and match the base shape completely while also not leaving any raw cardboard open near the nose. I really like how this came out and I like how the fur has a variety of blues and isn't just one hue.
|

|
|
Next I layered the blue over the nose. I started from the tip of the nose and worked my way inward toward the face. I layered each strand of blue over each other to create the fur look. I was a little scared to do this part because of the geometric shapes that made up the nose and the many areas which you could see where the pieces were glued together to make up the nose. Overall, I like how this turned out because you can't see any of the areas where I glued the pieces to make the nose up and the slight holed were covered with the blue strands.
|


|
The last part that I had to add color to was to the other side of the mask. I would be doing the same process as the blue side except instead of blue strands, I would be using yellow strands. I started off with making a row of yellow strands at the back of the mask with the points go outward and away from the mask. I continued this row by row adding more yellow strands to create the texture of the fur while slightly overlapping each strand.
|


|


|

|

|
I continued to layer each strand until I got near the eye area. I needed to match up the strands perfectly against the eye cutout as to not obstruct the view of the wearer. I did this by cutting the bottom of each strand to fit perfectly against the top of the ye cutout. I did the same for the bottom below the eye except for this I had to cut the tip in the shape of the bottom of the eye cutout.
|
|
This was the final area I had to fill in with yellow strands. For the nose, I began at the tip of the nose and worked my way inward towards the mask. I glued while slightly overlapping the tips of each strand. I had to perfectly cut the bottom of the strands when I got near where the nose and face part of the mask met as to not leave any raw cardboard visibly.
|


|


|

|
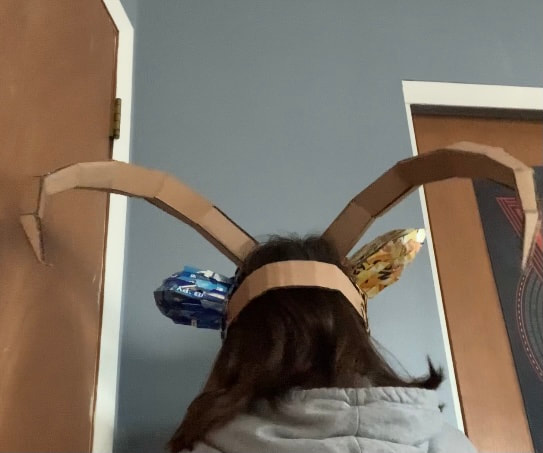
Finally, I glued the ears slightly behind the eyes and the horns near the top of the head. It was somewhat difficult to glue these structure onto the areas with fur on them so I wish I would've glued them before I glued all the strands. I still like the outcome after gluing each structure on though.
|

|

|
|
|
Reflection
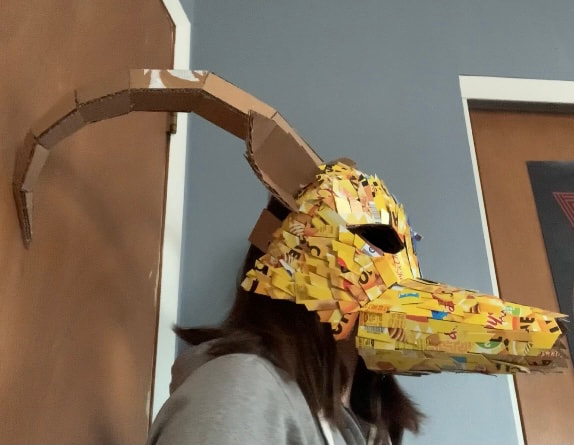
Overall, I am very happy and proud of the outcome of this piece. The process was very tiring as I had to repeat steps many times as well as cut many things out of cardboard such as all the little strands of yellow and blue cardboard. Even though there was a lot of work to be done with this project, I am happy with the progress I made as well as the overall modeling of the mask. At first, I wasn't too happy with the outcome of the base of the mask meaning all the pieces I glued together to get the shape because it looked sloppy to me and there was hot glue visible. By adding vibrant hues of yellow and blue strands of cardboard to imitate fur, not only did it cover the base of the mask, it also added texture, color, and depth. It made the piece look less flat and more three dimensional which I really liked. I was also very proud of the horns because I had never made anything have a curve before while modeling and much less out of thick cardboard but by making a model of the horns out of paper and gathering the necessary shapes I would need to cut out of the cardboard, it made it much easier to do so. I was very happy with the outcome of the horns because it contained many geometric shapes that looked really nice and the craftsmanship of it wasn't bad like the base of the mask.
My inspiration being Joan Miro's The Harlequin Carnival influenced my work because it gave me ideas for shapes I could include with deeper meanings as well as hiding those meanings in certain features. It also gave me ideas for colors I would use such as vibrant blues. Miro's work also influenced me to make my mask half blue and half yellow symbolizing happiness and sadness just as the harlequin character in his work portrayed. Another inspiration of mine that greatly influenced my piece was Loki's helmet within the Marvel universe. This gave me many ideas of what I could possibly create as well as gave me certain features I recreated and incorporated into my final piece. I used Loki's horn to represent another side of someone that they might not show or feel uncomfortable showing. The horns symbolize many things to Loki and emphasize his mischievousness and I decided to incorporate this within my final piece because my theme is mischief as well as emotions in general. The Bhutanese masks gave me a base in which I started my research on and gave me ideas that I could also incorporate animals into my final mask.
After completing this mask, I think in the future I would like to make an actual helmet. I wanted to make a helmet originally for this piece but as it was my first time crafting anything out of cardboard, I decided to go with a mask which is simpler and doesn't need as many dimensions as a helmet would. So in the future I would like to complete a mask with horns possibly longer and curvier than the ones in this piece.
Critique
Similarities
- In both piece, the main character contains a face that is half one color and half blue. This symbolizes contrasting emotions.
- Organic and geometric lines are included in each piece and creates texture and depth within each piece by having varying shapes.
- Both pieces have many deeper meanings than surface level. Mask of Emotion has deeper meanings within the horns as well as letting the eyes be visible and The Harlequin's Carnival has deeper meaning in each of the shapes included.

|
The Harlequin's Carnival
|
Differences
- The mediums for each piece is different. Mask of Emotion was created out of cardboard with hot glue while Joan Miro's piece was created as an oil on canvas painting.
- My piece contains three dimensional shapes including organic and geometric shapes while Miro's piece contains organic and geometric two dimensional shapes.
ACT Responses
Clearly explain how you are able to identify the cause effect relationship between your inspiration and its effect on your artwork?
My inspiration had a great influence on my final piece because I used many of the features, ideas, and themes in my inspiration pieces and incorporated them into my final piece such as Loki's horns, animal mask, and geometric and organic shapes as well as vibrant colors.
What is the overall approach the author has regarding the topic of your inspiration?
The overall approach the author had regarding my inspiration is that they acted on feeling and used whatever that specific feeling was to influence their art with no specific feeling in mind.
What kind of generalizations and conclusions have you discovered about people, ideas, culture, etc. while you researched your inspiration?
While I researched my inspiration, I realized that many times, painters grew up in poverty with often times little to no food and made paintings, which would one day be famous, and almost never getting an opportunity to sell any of thee paintings.
What is the central idea or theme around your inspirational research?
The central theme around Joan Miro's piece was poverty because the painter was poor and had no food and was in a trance while painting The Harlequins Carnival.
What kind of inferences did you make while reading your research?
Inferences I made while researching my inspiration is that I inferenced that it was due to being hungry and tired from many days of not eating is why Joan Miro painted a harlequin figure with a hole in its stomach symbolizing hunger.
